Roblox is a site where users can create and customize their avatars using different items like shirts, pants, and accessories. If you want to create your own clothes designs, Roblox shirt templates are a great place to start. This guide will explain what Roblox shirt templates are, how to use them to make your own custom shirts, and tips for making your designs unique.
What are Roblox Shirts Templates?
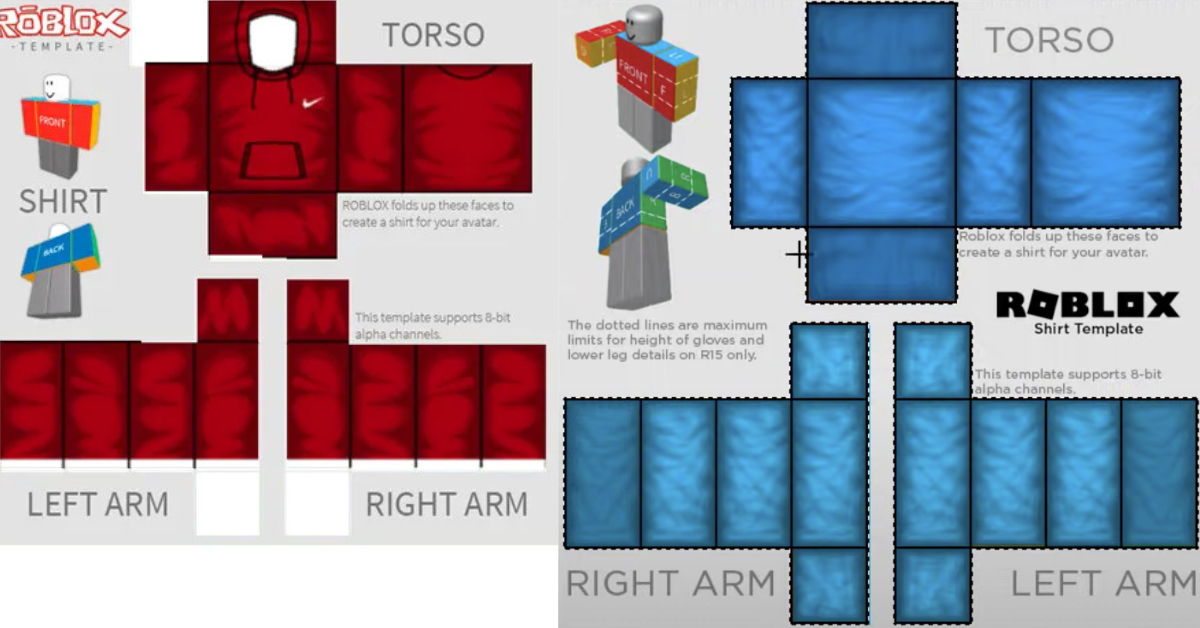
Roblox shirts templates are simple images that help you create your own clothes for your Roblox character. They are usually shown as 2D PNG images and are split into sections for different parts of the shirt, like the front, back, sleeves, and collar. These templates help users create shirts that will look great on their avatars when shared to Roblox.
Find a Template
Editing the Template
Follow the Guidelines
Save Your Design
Upload the Shirt
Why Create Roblox Shirts?
Making your own shirts on Roblox is a fun way to customize your image and can also help you earn Robux. If many people like your designs, they might buy them, which can help you earn money without much effort in the Roblox market. By learning how to use shirt templates and improving your design skills, you can become part of a group of people who create and sell custom clothes in Roblox’s marketplace.
How to Download and Use Roblox Shirt Templates
Find a Template:
Start by looking online for free shirt templates for Roblox. Many websites offer high-quality templates for you to download. You can also make your own template using an image editing tool like Photoshop or GIMP.
Editing the Template:
After you download the template, open it in an image editing tool. You will see a grid that splits the template into different parts. You can add your own art, patterns, or names to these areas to make your design special.
Follow the Guidelines:
Please take note of the plan. For example, the top part of the form usually shows the front of the shirt, while the bottom part shows the back. The sleeves are divided into two parts: one for the left arm and one for the right arm. If you’re not sure, look for online guides for helpful tips on layering your designs for the best results.
Save Your Design:
Once you’re done designing, save your picture as a PNG file. Make sure to keep the original size and shape so the design fits well on your character.
Upload the Shirt:
When your image is finished, go to the Roblox website and sign in to your account. Go to the “Create” section, choose “Shirts,” and upload your creation. Once you share your shirt, you can see it on your avatar in Roblox studio.
Tips for Designing Roblox Shirts That Stand Out
- Keep It Simple: Although it might be tempting to make a detailed design, simple and strong designs usually work better for Roblox shirts. A simple design can attract more attention and make it easier for others to understand.
- Use Vibrant Colors: Roblox avatars are colorful, so using bright colors will make your shirts more noticeable. Try not to use too many boring colors, as they might not grab attention as well.
- Focus on Detail: Focus on the little details in your design. Adding texture, shading, and designs can make your shirt look more stylish and real.
- Align with Trends:Stay updated on the latest fashion trends and popular themes in Roblox. If you create shirts that show current styles, more people are likely to buy them.
- Test Your Design: Before finishing your shirt, check how it looks on different characters. You want to make sure your design looks good and fits well from every side.
Conclusion
Roblox shirt templates help you make custom clothes for your character. Whether you’re creating for fun or hoping to sell your designs, following the right steps and making sure your designs are fresh and unique can help you do well in Roblox fashion. With some imagination and practice, you’ll be able to create unique shirts in the Roblox world!


